A smokey eye is one of our favorite eye makeup looks. It’s sexy, classic and suits everyone. The key to a flawless smokey eye is proper blending. That’s why it’s important to have at least two clean blending brushes before you start re-creating the looks below. Also, when rocking a smokey eye, remember to keep your cheeks and lips light.
These 21 tutorials will show you have to nail a perfect smokey eye look. Each tutorial has a step-by-step instructions that are easy to follow. Enjoy!
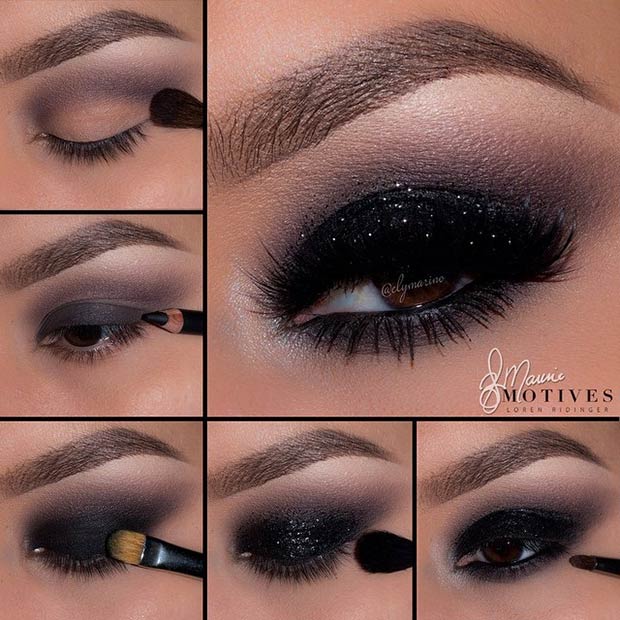
1. BLACK SMOKEY EYE + POP OF GLITTER

Instagram / elymarino
Step 1. Begin by applying a neutral eyeshadow onto your eyelid. This eyeshadow will make your blending easier. Using a clean fluffy brush, apply a dark grey eyeshadow onto your brow bone, and blend it slightly above the crease. This shade will make the transition between the black shades much smoother.
Step 2. Apply a black eye pencil or gel eyeliner all over your eyelid. Blend everything out.
Step 3. Using a flat eyeshadow brush, apply a black matte eyeshadow. Blend some more.
Step 4. Spice the look up with some glitter on the center of your eyelid.
Step 5. Line the waterline with a black eyeliner. With a smaller brush, apply a mix of grey and black eyeshadows below the waterline. Blend everything together and highlight the inner corner.
Step 6. Finish the look with a few coats of mascara and some false eyelashes.
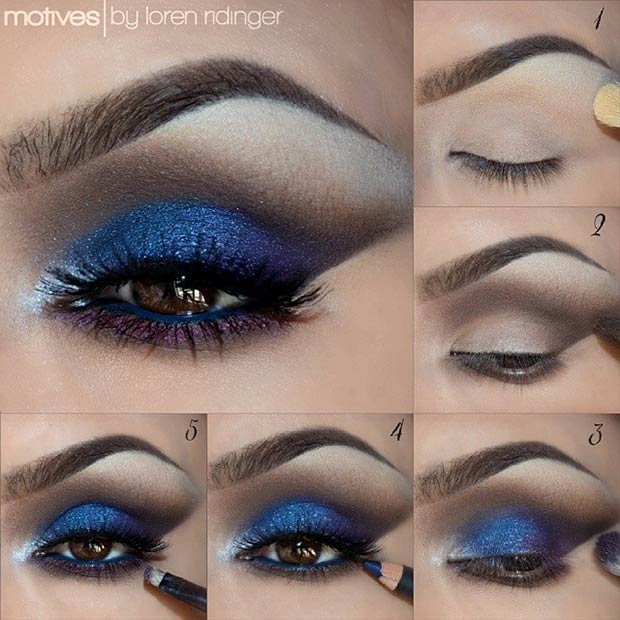
2. BLUE, BROWN & PURPLE SMOKEY EYE

Instagram / auroramakeup
Step 1. Start by applying an eyeshadow primer and let it dry. This step is highly recommended if you have oily eyelids. Next, apply a neutral eyeshadow as your base. Choose the color that’s similar to your skin tone.
Step 2. Highlight the brow bone. With a big and soft brush, apply a light brown eyeshadow to your crease. Take a dark brown eyeshadow on a blending brush and apply it above the crease and extend it to the outer corner of the eye. You can use scotch tape to get a sharp and clean edge. Apply some brown eyeshadow below your waterline, too.
Step 3. Highlight the inner corner of the eye with a shimmery silver or white eyeshadow. Apply a dark blue eyeshadow to the entire eyelid and some purple shade on the outer corner of the eye.
Step 4. Apply a thin line of an eyeliner along the upper lash line and your favorite false lashes. Line the waterline with a blue eye pencil.
Step 5. To bring the look together, apply some purple eyeshadow below your waterline. Apply mascara over your lower lashes.
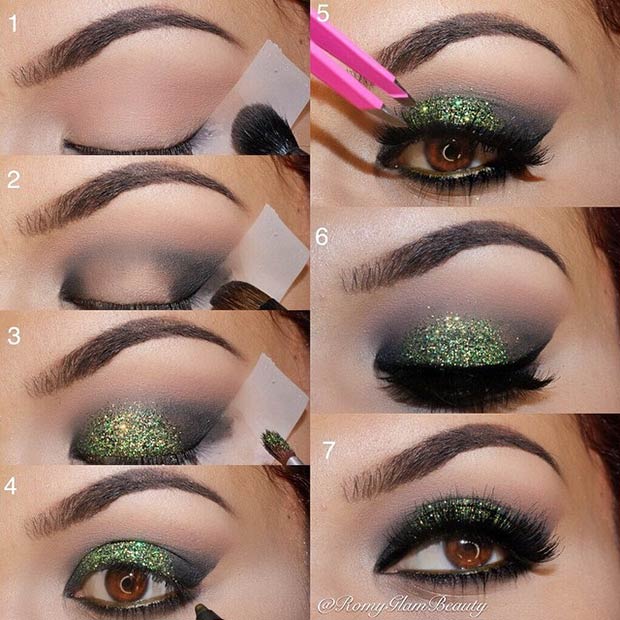
3. BLACK & GREEN GLITTER LOOK

Instagram / RomyGlamBeauty
Step 1. Place a piece of scotch tape on the outer corner of your eye, at an angle. To make the tape less sticky, place it on the back of your hand few times. This makeup trick will make your smokey eye less frustrating. Using a large blending brush, apply a light brown eyeshadow to your crease.
Step 2. Using light patting motion, apply a black matte eyeshadow to the inner and outer corner of the eye, slightly bringing it to the crease. Leave the center of the eyelid untouched.
Step 3. Apply a glitter glue to the center of the eyelid and pat the loose glitter pigment on top.
Step 4. Peel the tape off and put some black eyeshadow to the lower lash line. Line your waterline with a black eye pencil.
Step 5. Apply a black liquid eyeliner along the upper lash line and some mascara to the lower lashes. Finish the look by applying your favorite falsies.
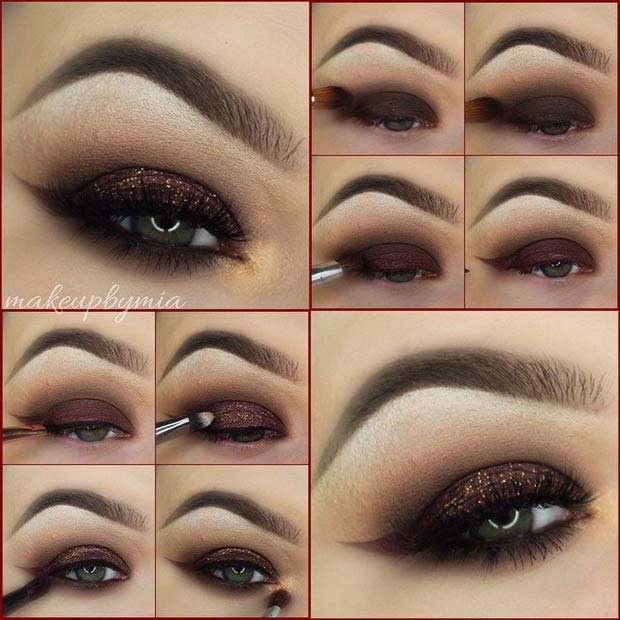
4. DARK BROWN LOOK

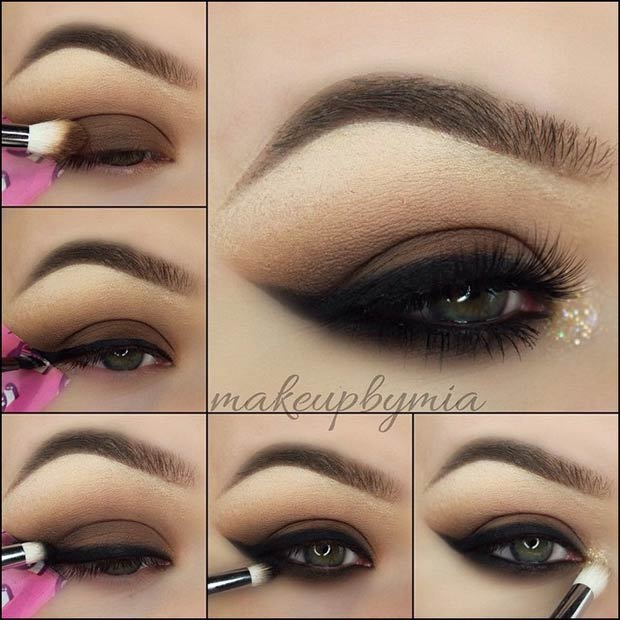
Instagram / MakeupByMia
Step 1. Prime your eye with an eye primer and let it dry. Apply a dark brown eyeshadow to your entire lid and blend it out.
Step 2. Now pick a light brown eyeshadow and apply it to your crease with a blending brush. Blend until you’re happy with the look.
Step 3. With a flat shader brush, apply a dark plum eyeshadow onto the lid and blend it slightly into your crease.
Step 4. Spray some MAC Fix Plus setting spray onto an angled liner brush. Dip the brush into the purple eyeshadow from the last step and create a wing. The spray will intensify the eyeshadow and make it more adhesive. If you don’t own any setting spray, you can use water.
Step 5. Next, line your top eyelid with your favorite gel eyeliner in black.
Step 6. Apply some copper glitter onto your eyelid to make your eyes pop.
Step 7. With a small brush, apply the same brown shades on your lower lash line.
Step 8. Highlight the inner corner with a gold eyeshadow. Finish the look with your favorite false eyelashes.
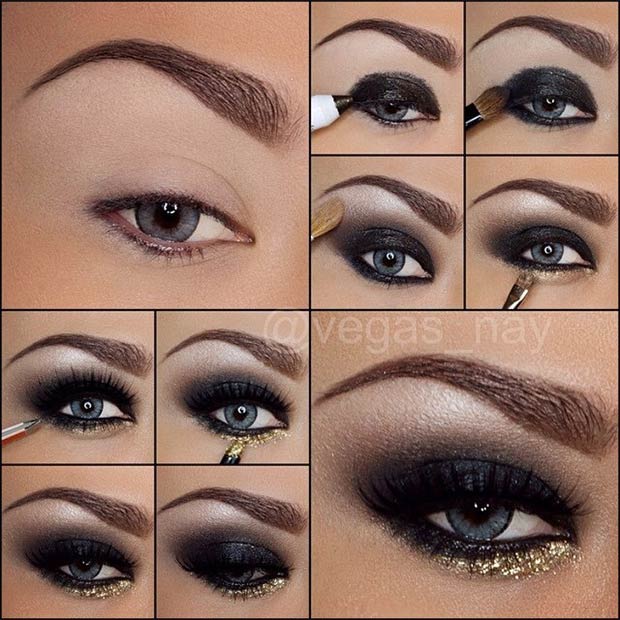
5. BLACK SMOKEY EYE + GOLD GLITTER

Instagram / vegas_nay
Step 1. Prime your eyelid with an eye primer and let it dry. This step will make your black smokey eye last longer.
Step 2. Apply a black eye pencil as your base. The eye pencil used in tutorial is NYX “Knight”. Apply some black eyeshadow to your lower lash line, too.
Step 3. Pat a black eyeshadow over the black base.
Step 4. Pick a light brown eyeshadow and blend everything together with a big and soft blending brush.
Step 5. When you’re happy with the blending, highlight the brown bone with a silver or white eyeshadow. Blend the shades together until there are no harsh lines.
Step 6. It’s time to spice up the lower lash line! Apply some baked gold eyeshadow along the lower lash line with a small brush.
Step 7. Build the color up by adding in a gold glitter. Finish the look with a pair of long and wispy eyelashes.
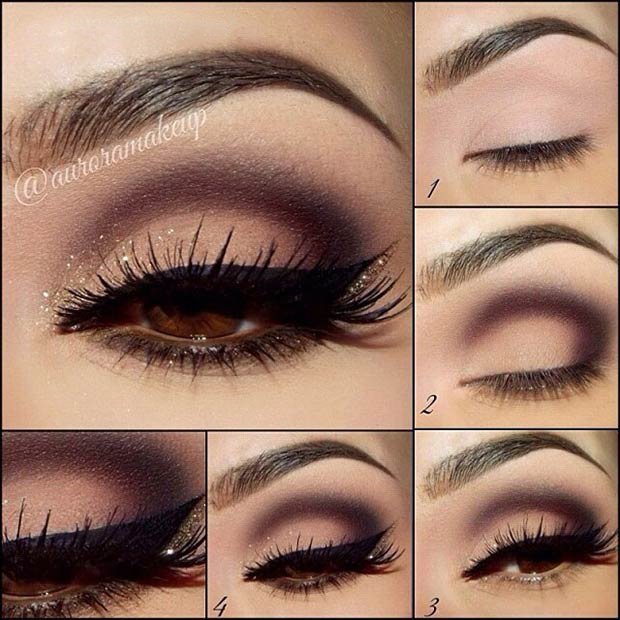
6. SMOKEY CUT CREASE

Instagram / AuroraMakeup
Step 1. As always, you need to prime the eyelid. If you don’t have an eye primer, you can use a foundation or concealer. They’ll do the trick.
Step 2. Pick a black eyeshadow and create a cut crease. Blend it out with a dark brown eyeshadow. Apply a neutral or light brown eyeshadow on your mobile lid. Highlight the inner corner and brown bone with a vanilla colored shade.
Step 3. Create a black winged eyeliner. You can use liquid or gel eyeliner, whatever you prefer. Apply a pair of false eyelashes.
Step 4. Line your waterline with a brown pencil and blend it out with an eyeshadow you’ve used to create a cut crease. Create a gold glitter wing on your lower lid, too. Finish the look by adding some gold glitter above the inner corner.
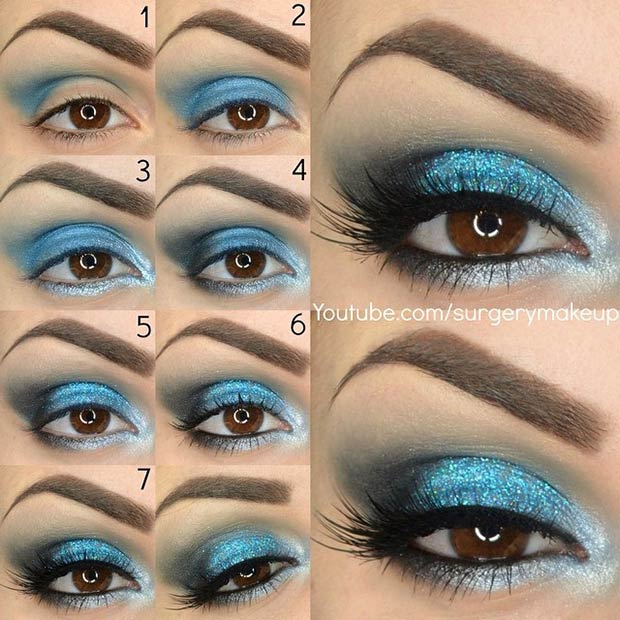
7. LIGHT BLUE GLITTER LOOK

Instagram / SurgeryMakeup
Step 1. Apply an eyeshadow primer. Pick a light blue eyeshadow and blend it out in the crease.
Step 2. Apply a shimmery blue eyeshadow onto the eyelid.
Step 3. Yes, another blue eyeshadow! This one should be a shimmery light blue shade. Apply it along the lower lash line and on the inner corner of the eye. Use a smaller brush to have a better control.
Step 4. Add some depth to the look by applying some black eyeshadow to the outer corner of the eye. Blend the shades together.
Step 5. Next, carefully pat a light blue glitter onto the lid.
Step 6. You’re almost finished! To make your eyes appear bigger, apply some mascara on the upper and lower lashes. Line your waterline with a black pencil.
Step 7. Apply false lashes.
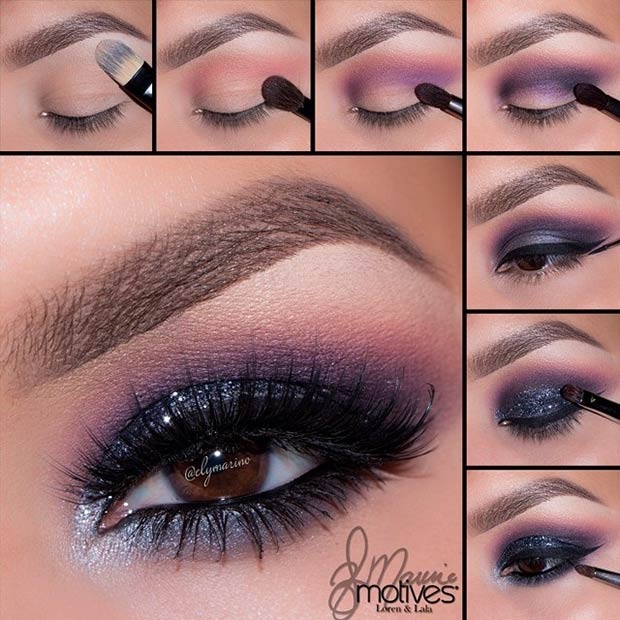
8. GREY & PURPLE LOOK

Instagram / elymarino
Step 1. Apply a neutral eyeshadow as your base.
Step 2. Using a blending brush, apply a pink eyeshadow (or blush) slightly above the crease. This shade will be your transition color.
Step 3. Next, build up the look by adding some purple eyeshadow into the crease.
Step 4. Add some depth with a black eyeshadow. Apply it to the inner corner and blend to the crease. The shade should be darkest in the outer corner of the eye.
Step 5. With a patting motion, apply a shimmery grey eyeshadow onto the lid without touching the crease.
Step 6. Apply a black winged eyeliner. Use a liquid or gel eyeliner.
Step 7. To make those eyes sparkle, apply a glitter glue onto the lid and pat a silver glitter over it.
Step 8. Line the waterline with a black pencil. Apply a mix of the black and purple eyeshadows along the lower lash line. Finish the look by highlighting the inner corner and applying false eyelashes.
9. BLACK SMOKEY EYELINER

Instagram / makeupbymia
Step 1. Apply a thin layer of an eye primer. Next, apply your base eyeshadow. The base eyeshadow should be a neutral shade that’s similar to your skin tone. Take a light brown or peachy eyeshadow on your crease brush and blend the shade into the crease. To intensify the look, pat a dark brown shade onto your lid.
Step 2. Line your upper lash line using a black gel liner. Make a thick and big wing. It doesn’t have to be perfect!
Step 3. Smoke out the liner using a small pencil brush and a black eyeshadow.
Step 4. Using the same brush from the last step, apply all four eyeshadows to your lower lash line.
Step 5. Highlight the inner corner with a gold sparkly eyeshadow. Lastly, apply false lashes.
10. BROWN SMOKEY EYE

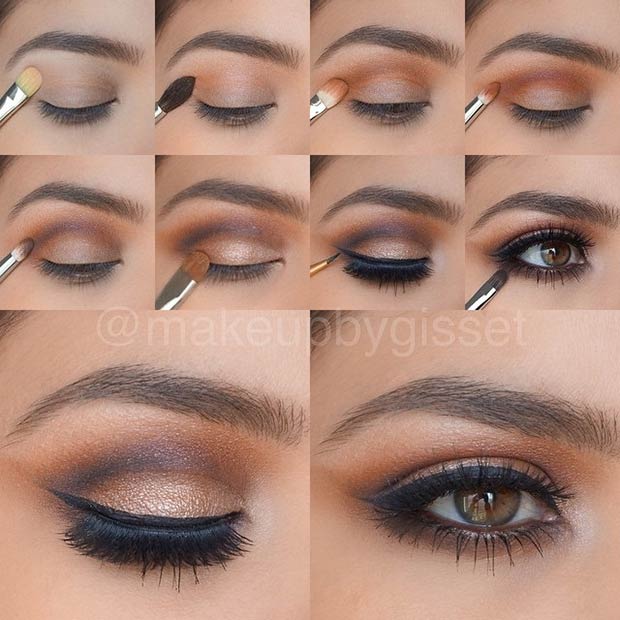
Instagram / makeupbygisset
Step 1. Start the look by highlighting your brow bone.
Step 2. Apply a taupe brown eyeshadow. This will be your transition color.
Step 3. Next, take a warm medium brown eyeshadow and apply it to the crease.
Step 4. To add depth and dimension to the eye, apply a red brown eyeshadow to the crease.
Step 5. With a deep brown eyeshadow, create a soft cut crease effect.
Step 6. Using a flat eyeshadow brush, pat a shimmery beige eyeshadow onto the lid.
Step 7. Apply an eyeliner.
Step 8. Smoke out the eyeshadows on your lower lash line.